Running Open WebUI + Ollama in Portainer
June 15, 2025Tags: containers, ai
Recently, my husband decided to explore running Portainer to learn about containers. Since we’re both on container adventures at the moment, we’re both working with containers on Portainer.
For me, I wanted to set up something like an internal ChatGPT. I am aware of Ollama for large-language models (LLMs). However, I wasn’t sure about the web UI component. After some searching, I found Open WebUI.
This morning, I loaded OpenWebUI + Ollama in Portainer, and I want to share my adventures.
It Started with One Command
I was reading through Open WebUI and found the Open WebUI Bundled with Ollama. When I see them bundled, that means that I most likely will have little configuration on my part! This is the command that let me run both of these together with minimal work on my part:
docker run -d -p 3000:8080 --gpus=all -v ollama:/root/.ollama -v open-webui:/app/backend/data --name open-webui --restart always ghcr.io/open-webui/open-webui:ollama
Let’s talk about what’s going on:
docker run- starting a Docker container-d- detached mode-p 3000:8080- maps port 8080 in the container to port 3000 on the host machine. This lets you access the Open WebUI site at http://localhost:3000, which calls to port 8080 on the container.--gpus=all- makes all available GPUs accessible to the container. We need this because Open WebUI is designed to use the GPUs for accelerating LLM inferencing.-v ollama:/root/.ollama- creates a volume namedollama. The container’s/root/.ollamais how to access the mountedollamavolume.-v open-webui:/app/backend/data- creates a volume namedopen-webui. This container’s/app/backend/datais how to access the mountedopen-webuivolume.--name open-webui- the name for this Docker container--restart always- the restart policy. If the container exits for any reason, Docker will automatically restart it.ghcr.io/open-webui/open-webui:ollama- this is the image name.
I run this locally, as I have a laptop that was spec-ed out to run AI and ML loads. At the time I bought this machine a few years ago, I was working on my data bootcamp that did address some AI and ML things. So I have a GPU setup that works well for this.
Running in Portainer
Learning Portainer has been quite an adventure, since I already spend a lot of time in Docker Desktop locally. Where we might use docker-compose, they call that feature Stacks.
This is the docker-compose equivalent of the docker run command from above:
version: '3.8'

services:
  open-webui:
    image: ghcr.io/open-webui/open-webui:ollama
    container_name: open-webui
    ports:
      - "3000:8080"
    volumes:
      - ollama:/root/.ollama
      - open-webui:/app/backend/data
    deploy:
      restart_policy:
        condition: always
    runtime: nvidia
    environment:
      - NVIDIA_VISIBLE_DEVICES=all

volumes:
  ollama:
  open-webui:
Note that the equivalent to --gpus=all involves 2 things:
- runtime: nvidia
- the environment variable NVIDIA_VISIBLE_DEVICES=all
This is how I deployed Open WebUI + Ollama in Portainer:
- Log into Portainer.
- Go to Stacks > + Add Stack.
- Name the stack.
- Paste the above YML in the editor.
- Select Deploy the stack.
And now I have Open WebUI + Ollama running locally! But wait… this isn’t enough.
Adding Models for Open WebUI
By default, Open WebUI + Ollama does not have any bundles installed. So you’ll need to get your own models. They make this easy!
- Log into your Open WebUI setup. If I’m running locally, it’s at http://localhost:3000.
- For the first time running this, create a new account by providing your name, email address, and a password. This is the admin account for your Open WebUI site.
- Once you get to the main page, in the upper right corner, select your profile icon, then Admin Panel.
- Select the Settings section.
- Select the Models section.
- On the Models page, to the right of the heading, select the download icon for Manage Models.
- In the Manage Models dialog, in the section under Pull a model from Ollama.com, enter a model tag. For example, you may want a small model like
mistral-small. Put the model tag in the text, then click the download button to the right of it.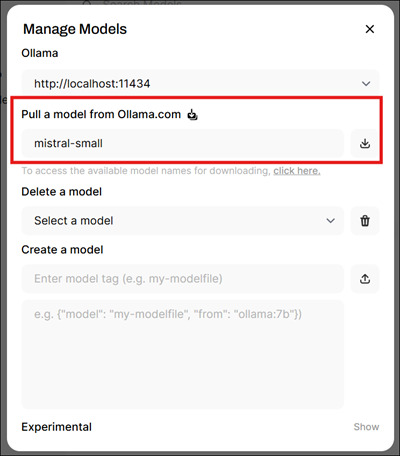
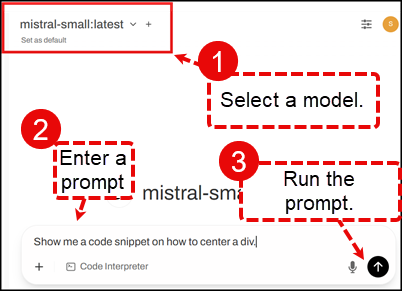
- Once you have a model installed, then you can select a model and prompt it for answers.
Conclusion
In this blog post, I was able to run Open WebUI + Ollama both locally in Docker with the docker run command and on our Portainer server. I added at least 1 model so that I could throw a prompt at it.
Now that these are set up, I am going to review some of the prompt engineering courses over at DeepLearning.ai!