This blog post accompanies a demo I did for my Intro to Azure DevOps talk with the Northeast Ohio Women in Tech (NEOWIT) group yesterday. I’m breaking this up into multiple parts in order to talk through the Azure App Service adventures. We will try to stay within the browser so that we don’t have to install a development environment locally.
In Part 1, we are going to look at the Azure DevOps + Azure App Service integration using Azure Repos and building with the App Service Build Service. This is the Hello World version for getting started with Azure DevOps + Azure App Service.
In Part 2, we are going to look at using Azure DevOps pipelines to deploy to Azure App Service. When you have custom build steps, this is the route to go.
For both of these posts, we will be using the .NET 6 Hello World Azure sample.
Since I know that some of my audience are new to Azure, there are more links here for getting acquainted with the Azure environment.
Prerequisites
For this post, you will need:
- An Azure account. Get a free Azure account from the Azure website.
- An Azure DevOps project. You can name it
DotNetCoreSample. See Create a project in Azure DevOps for more details.
Import the code
Once the project is created, then import a copy of the code into your Azure DevOps project’s repository.
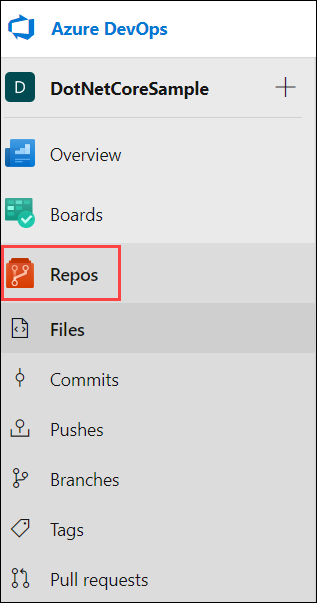
1. Navigate to the Repos section.
2. In the content of the Files page, under the Import a repository header, select Import.
3. In the Import a Git repository dialog, leave the Repository type as Git. For the Clone URL, use: https://github.com/Azure-Samples/dotnetcore-docs-hello-world
4. Select Import.
Create the Azure App Service
Once you have a copy of the code, you will want to set up a place to host the code. For this post, we will use Azure App Service.
- Log into the Azure portal.
- From the home page, select Create a resource.
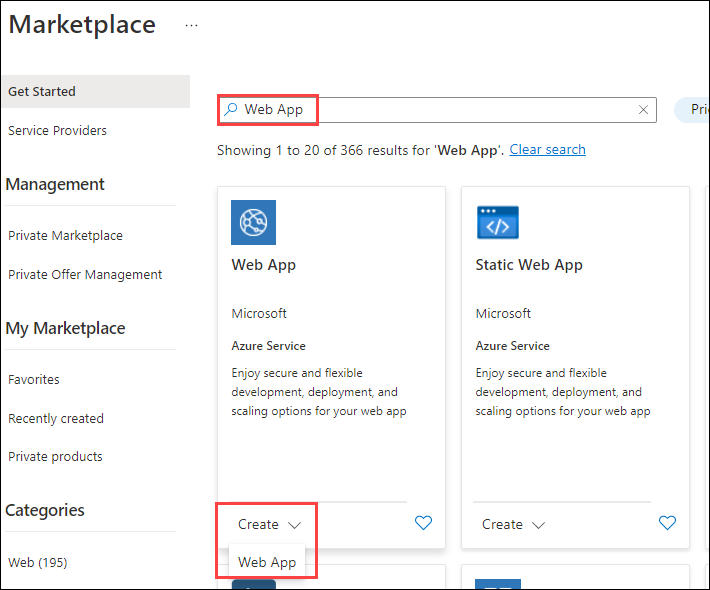
- Search for
Web App. Once in the results, on the Web App result, select Create > Web App.
4. In Project Details, select your Subscription. For the Resource Group:
- If you do not have a resource group, select Create new and give your resource group a name. This resource group is used for grouping your Azure resources together.
- You can select an existing resource group if you prefer.
5. In Instance Details:
- Give your app a name. App names have some limitations, including:
- Names can have alphanumeric characters and hyphens.
- Names cannot start or end in a hyphen.
- Names must be less than 64 characters.
- For Publish, select Code.
- For Runtime stack, select .NET 6 (LTS).
- For Operating System, choose either Linux or Windows. I demoed creating the Windows app, and I also showed the Linux hosted application. This code works on both Linux and Windows.
- For Region, choose a region close to you.
6. An App Service Plan determines the features, compute resources, location, and costs associated with your application.
- In App Service Plan, select Create new and give it a name.
- For Sku and size, select Change size. In the Spec Picker, select Dev/Test and the Free tier. Then, select Apply.
7. Select Review and create. Once the summary displays, then select Create.
Set up the integration in the Deployment Center
When creating a web app in Azure, you can also set up GitHub Actions integration as part of the creation process. It appears on the Deployment section. However, this is only for GitHub Actions. As our demo is using Azure DevOps, we are bypassing that.
Once an application is created, you can set up integration with other services – including GitHub, Bitbucket, and Azure Repos – in the Deployment Center for that app.
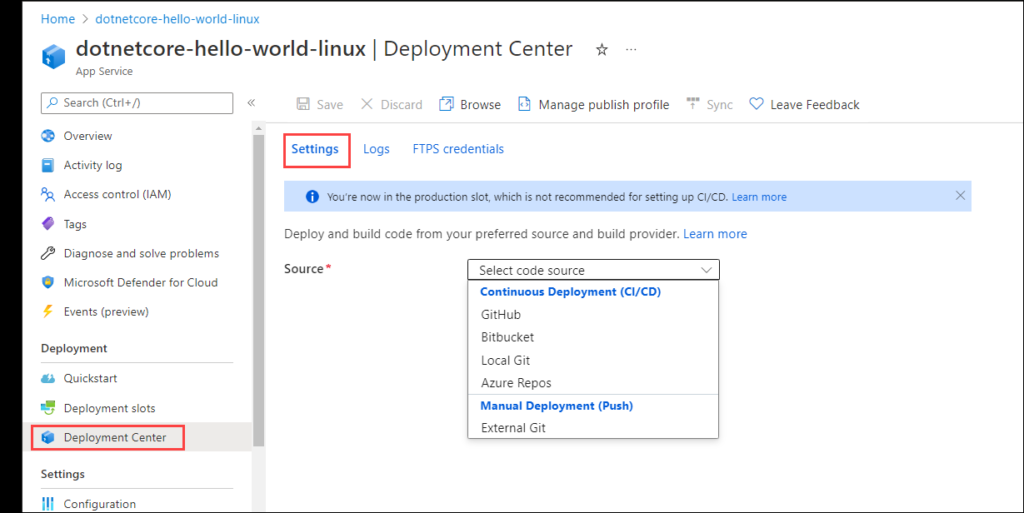
- Navigate to the new web app by selecting Go to resource after the creation process is complete.
- From the navigation on the left, navigate to Deployment > Deployment Center.
- On the Settings section:
- For Source, select Azure Repos.
- For this example, we are using Building with App Service Build Service.
- In Azure Repos, select the Organization, Project, Repository, and Branch for your demo repository.
4. From the actions toolbar, select Save.

Once this is saved, the code should be deployed. You can check on the deployment status by navigating to the Logs link in the Deployment Center.
See it deployed
You can see the deployed application by going to the app’s Overview and selecting the value that appears next to the URL label. You should see the “Hello World” messaging.
You could also select Browse from the action bar on the Overview to go to the hosted application.
Make some changes in Azure DevOps
Let’s make a minor update to the code. If you ever find yourself in a spot where you need to make a minor change and don’t want to load your editor on your machine, know that Microsoft has you covered in the Azure DevOps space. They have incorporated Visual Studio Code for Web into Azure DevOps.
- Navigate to your Azure DevOps project. Go to the Repos section.
- Within the file structure, navigate to Pages/Shared/Index.cshtml.
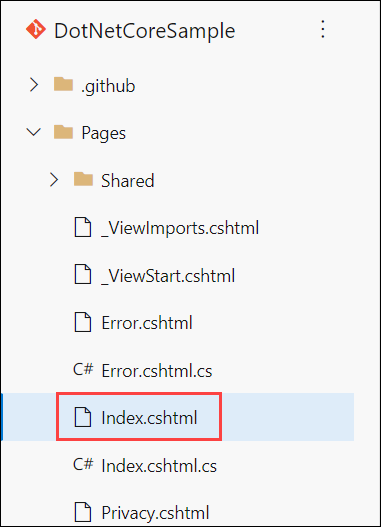
3. Press period (.) on your keyboard to launch the Visual Studio Code for web editor.
4. Change the text from “Hello World” to “Hello Azure”.
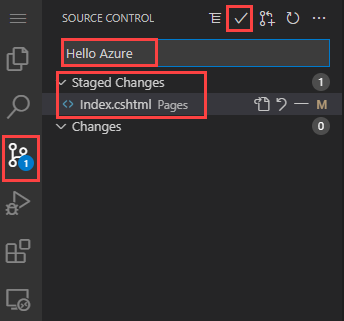
5. Navigate to the Source control section. Select the + next to Index.cshtml to stage the changes. Enter a commit message such as Hello Azure. Then select the checkmark icon to commit and push your changes.
Watch the Deployment Logs
Once the changes are committed and pushed, the App Service Build Service will update the web app with the new code. It handles listening to the Azure Repo for changes based on the configured Organization, Project, Repository, and Branch. Once it sees the changes, it works its magic – which is Project Kudu.
While the App Service Build Service is handling building and deploying, you can see its progress.
- Navigate to your web app in the Azure portal.
- Select Deployment Center.
- Select Logs.
- The Status field will show the progress. If you want to see details, select the Commit ID for the logs for that deployment.
See the updated changes deployed
Navigate to the deployed app. You should now see “Hello Azure” as part of your messaging.
Conclusion
In this demo, you:
- Created an Azure DevOps project.
- Imported code into Azure Repos.
- Created an Azure App Service.
- Deployed code to Azure App Service with Azure Repos integration using the App Service Build Service.
- Edited code in Visual Studio Code for Web.
- Saw the changes to the application as they were deployed by the build service.
If you are in a GitHub situation, you can go through this demo with GitHub integration by checking out the ASP.NET quickstart for Azure App Service.
[…] Part 1, we looked at the Azure DevOps + Azure App Service integration using Azure Repos and building with […]
[…] Working with Azure DevOps + Azure App Service – Part 1 […]
[…] Working with Azure DevOps + Azure App Service – Part 1 and Working with Azure DevOps + Azure App Service – Part 2 and Adding Super-Linter to the Azure DevOps Build (Sarah Dutkiewicz) […]